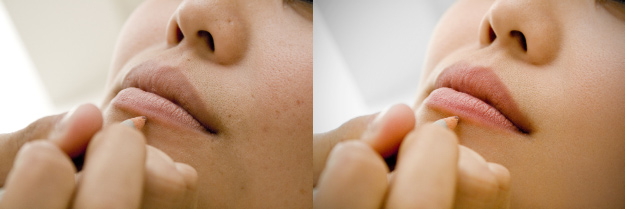
Welcome to Part 1 in a series of retouching tutorials aimed at the beginner. I’ve always loved the art of retouching and have been more than happy to tutor and teach people new to the software and the art. Having been asked to produce these Photoshop tutorials it is with great pleasure I bring you this first introduction to retouching for beginners.
Before reading this first Photoshop retouching tutorial I would suggest reading my article on Retouching Mistakes and How To Avoid Them. Having a solid idea of why you’re editing something will make the difference between being an artist or a computer operator in your new hobby or profession as a retoucher. The retouching techniques you will learn through this series of articles will give you the tools you need, and advice on how those tools should be applied on a case by case basis, rather than treating them as catch-all techniques.
Basic Photoshop Retouching Tools
To become proficient in Photoshop retouching you need to learn how to use the tools at your command proficiently. You’ll certainly have learned if you’ve followed any of the popular online Photoshop tutorials that generally you’ll be given a set of steps to follow, with very little in the way of explanation. These retouching tutorials are different in that they’ll give you the ability to break away from blurry ten-step quick fixes and on the path to producing high quality, high resolution masterpieces.
In this series on Photoshop retouching we’re going to start out with an important set of tools you’re going to need for retouching models, clone stamp, dodge and burn, masking and adjustment layers. Then when we’re done with all those, later in the series we’re going to flip them on their head and explore new ways of using these techniques for better results. But first, here are the basics.
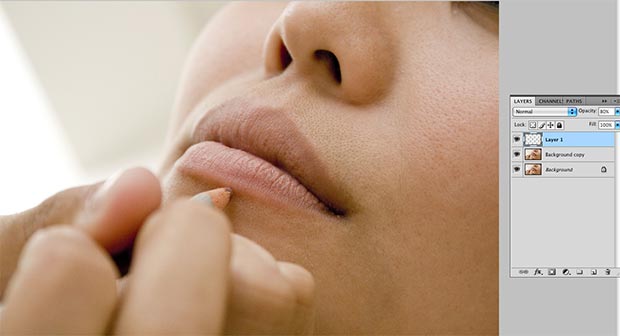
You can use any image to practice, but I’d highly recommend getting an account at stock xchng, a free stock photography site. Try to practice on the sharpest, highest resolution images you can find. For this first exercise I’ll be using this image.
Clone stamp
In your toolbar (on the left by default) you’ll find your clone stamp tool. Click the icon or press S on your keyboard to select it ![]()
The Clone Stamp works by selecting an area of your image and painting it over another section. This is useful in painting out blemishes by using a similar area of texture to cover it. After selecting the Clone Stamp tool, you can hold Alt and left-click an area of your image. This selects your source point. Then releasing the Alt button, left click elsewhere to paint with the source point. Try it on our practice image. Remember to use a similar area of texture, you will usually choose the source pixels from very near the blemish.
Now look at the clone stamp options at the top. It’s at this point most tutorials will tell you to copy their settings. Don’t!
Instead we’ll look at what each option does and how it can be applied to your work, you’ll learn far more from choosing your own settings. They’ll all start to make sense as soon as you start to practice with them;

A) Brush settings, including Master Diameter (size of brush) and Hardness (the amount of ‘feathering’ of the brush edges). Try to use a brush size similar to the size of the blemish to be removed, zoom in close and try not to remove any texture detail unnecessarily. Use a softer brush for now, so set Hardness to low so the edges blend in smoothly.
B) Blend mode: for now we’re going to look at Normal, Lighten and Darken. In Normal blend mode the Clone Stamp will simply paint using the source point. In Lighten blend mode, the Clone Stamp will paint the source over the darker areas only, such as dark pores or hairs on skin, and in Darken blend mode the source information is painted over the lighter areas, such as ‘peach fuzz’. Use these wisely, remembering to retain as much of the original texture as possible.
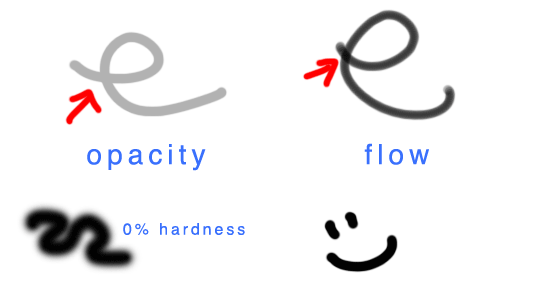
C) Opacity is the degree to which the stamp covers or reveals the layers beneath, so 1% Opacity is an almost transparent brush stroke, and 100% Opacity completely hides the layer below. When keeping your mouse button held (or your stylus tip to your graphics tablet) the Clone Stamp will continue to paint at your set opacity, and will ignore previously painted areas in the same stroke. You’ll need to release the mouse button and reclick to start to strengthen the opacity (demonstration below).
D) Flow works similarly to Opacity, but allows you to build the effect over previously painted areas in the same stroke. Don’t worry at all about these two settings at this point, but try using the Brush Tool (![]() or B on your keyboard) and painting black onto a blank white canvas to see the difference. Learn how the Hardness slider works while you practice.
or B on your keyboard) and painting black onto a blank white canvas to see the difference. Learn how the Hardness slider works while you practice.

Click here for a simple, useful demonstration of how each setting behaves. The Clone Stamp brush settings work in the same manner.
E) Enable Airbrush simulates the gradual building of colour with a traditional airbrush, and only really comes into play with a pressure sensitive graphics tablet. Don’t worry about it for now. The Aligned box allows you to choose whether or not to reset your source point when you release the mouse button. If you need to paint with your source point on multiple areas, uncheck it, but beware of repeating patterns, the eye can pick up on the same pores, hairs, leaves etc. if they’re repeated too often in an image, so be careful.
F) Sample allows you to choose which layers in your layers palette to choose your source point from. It’s useful to start a brand new blank layer by clicking the New Layer icon at the bottom of your layers palette and setting the brush to sample Current and Below. The ‘Current’ bit isn’t the important part of course, there isn’t anything on it! It’s the Below part that helps us out here, as we can sample from our image below and paint onto an entirely dedicated cloning layer, which we can alter, delete or change the opacity of without ever affecting our original image.
Exercise: Use our practice image to remove most prominent dark blemishes and pores. Start a new layer and set Clone Stamp to sample Current and Below, choosing the best blend mode. When you are finished, consider adjusting the layer’s opacity slider until you’re happy with the result. Remember there is more work to be done, so perfection isn’t the aim at this point, any improvement is a step forward.

Continue to Retouching in Photoshop 1 – The Basics Part 2
[related_posts]